 CS
3660:
Interactive Machinima
CS
3660:
Interactive Machinima
Spring 2010
Home |
Syllabus | Schedule
|
Resources
Resources that
you may find useful
Warning - DO NOT USE SPECIAL CHARACTERS (dots, underscores, dashes, spaces) in any file names. There are quirky problems in adobe premier, half-life 2, and other places. Just use letters and numbers!!!!!
Do not forget that we have lots of Noesis tutorials installed on machine 6-1 in the WEB 130 lab. They show all of the details of getting going with machinima and really covers the details well. The two that you will use the most in the beginning are the Choreography and the Cinematography ones from Ross Scott.
Things that you need to get set up and running:
- Steam - steam is the software distribuition environment that Valve uses to send out games and updates to the games. Students in the class receive accounts that lets them access steam and download and use any Valve produced games. Including all of the Half-Life 2 versions, Team Fortress, Portal, Left 4 Dead, etc. In order to get started, you must first download steam from here. Then install and login with your user id and password. You can pick up your login and password using this link. Here are some hits on how to setup steam for making machinima.
- Next, in order to use faceposer, you have to install the Microsoft source SDK 5.1 and ONLY the 5.1 version which is
here (note, this is already installed on the lab
machines). Also, the one that you need to install is the
SpeechSDK51.exe (68.0 MB).
- You are going to become very familiar with a particular directory where steam is located. You will go to this directory a MILLION times. It is typically located in c:\program files\steam\steamapps\<yourloginname>\half-life 2 episode two\ep2 directory. If this directory is missing, then it is possible that when you installed steam you might have forgotten to actually run the HL2 episode 2 game (which extracts a bunch of files and installs them for you).
- Next you should grab a whole slew of files and drop them into this magic directory. The files include the dragon and skeleton models from the video, other models, sounds, etc. These files are located here. Just grab the zip file, open it up and copy the entire contents into the ep2 directory. Note - it will likely complain that some of the directories already exist, but that is ok. Just let it copy all of the files and if some are already there, let it replace those with the new versions.
- You need an audio editor. We use Audacity, but you could also use whatever you may already be familiar with. Whatever tool you use, you must be able to generate wav files. MP3's will NOT work. Audacity is here. In the tutorial, he says that you may want reverberation in your audio (such as talking inside of a helmet). Here is the audacity page about freeverb2 which will do this.
- Ross Scott uses virtualdubmod. If you search for it and download it, it is not everything that you need. What you need to do is search for virtualdubmod_1_5_10_2_all_inclusive.zip and you can find it. You can also just get virtualdubmod. Or if you use adobe premier or other tools, they will do the job as well. It is up to you what you use for video editing.
- Ross uses avisynth. This is a program that lets you add filters and commands to your videos. He uses this if you are using xvid codec or if you are trying to do motion blur. We have't used this, but it may be useful.
- You may need fraps to record videos. This needs to be decided on, so don't worry about it right now. Fraps isn't free, so don't get it for now.
- Nem's Tools is a great source for useful tools for messing with Machinima.
We use GCFSCAPE to grab files all of the time (especially if you want to edit something). Or for example, if you need some prop from other games such as counter strike. Also, there are some cool plugins for photoshop that lets you directly edit the texture files that Half-Life 2 uses.
- GCFScape is a tool that lets you take apart the gcf files to extract
models and textures
- VTFEdit is a tool to let you import and export textures
- We would prefer that you use the xvid codec when recording (www.xvid.org). When Ross configures the xvid encoder, he uses the xvid utility "Configure Encoder". For Win 7 (64 bit) it fails. However, when you actually choose the coded (either when recording or when using something like virtual dub) you can configure it as he does. The recommended settings are: Click on more by the Profile @ Level: (unrestricted). When the new window pops up, choose: MPEG for quantization type and make sure that B-VOP is unchecked. Also, on the aspect ratio tab, make sure that it is set to square pixels. Now click on ok and go back to the encoding type. Set this to single pass and click on more. Make sure that your settings are 16, 100, 100 and then click on ok. Move slider to the left, so the target quantizer goes to 1.0. This will make the largest compressed file which is good for editing. If you want to make a smaller file for the final version you could slide this more to the right (reducing quality, but also reducing size). Under Quality preset at the bottom, choose "(User Defined") and then click on more. Now For motion search precision choose ultra high and turn for vhq mode, turn this off. Verify that chroma motion is checked and the drop ratio should be 0 while maximum i-frame interval of 300 works fine. Click on the quantization tab, verify that you have 1, 31, 1, 31, 1, 31 for the values and make sure that Trellis quantization is unchecked. Click on ok. Finally go to Other options. Make sure that fourcc used is XVID. Uncheck display encoding status. Other tabs should be fine. So, that is all of the settings.
- When making a video, you should do the following:
- In the console set host_framerate 30 (30 is best for online use)
- The bug that Bob was having recording dragon seems to be fixed by doing host_timescale 1.0 (he sets this both before calling startmovie and after just in case)
- Then startmovie <name of image file>
- Then you do whatever it takes to run your movie (resume - let it play and the escape back to the console when you are done). Then type endmovie
- This will generate in the ep2 directory a zillion <name of image file>N.tga files which you can join together using virtualdub or adobe premier or whatever your favorite tool is. It also generates a <name of image file>.wav which is the sound.
- You can also use the generate the avi file model which is the same as the instructions above, but you say startmovie <name of file> avi (such as startmovie dragon avi - there are no dots between the dragon and avi just a blankspace). It will pop up the dialog box on which codec to choose and you should choose xvid and configure as above. The dragon.avi file will be stored in the directory ABOVE the ep2 directory (half-life 2 episode 2).
- If you want to work with models and textures, sometimes it is hard to figure out what texture is being used with a model. Wunderboy's mdltextureinfo is a great tool for doing this. It is located here (scroll down near the bottom). What I do is install it and then create a shortcut on my desktop for the program. Then you can simply drag a mdl file and drop it on the shortcut. It will then show you the textures that are used in that model. Saves a lot of time so you don't edit the wrong texture.
Other links:
Machinima
Half-Life 2
Hammer
- Noesis Interactive DVD teaching about how to use Hammer is installed on
Lab6-1 in the EMCB 130 computer lab
-
Building your first map
- General
Level design
- How to remove a texture and change it and put it back tutorial
from Impulse 101 team fall 06 semester is
here - although it is much easier using gcfscape and vtfedit (we need to
write a tutorial and get rid of this one).
Faceposer
-
avi Video on how to use faceposer (part1
and part2) - I can't find where I found
these, but we should put in a link there instead of to our local copy!!!
-
Nice tutorial on how to make a faceposer scene
- As it says in the tutorial, you need to download and install the MS
Speech SDK 5.1 which is
here (note, this is already installed on the lab
machines). Also, the one that you need to install is the
SpeechSDK51.exe (68.0 MB). This has problems with Vista.
- Here
is more stuff on the phoneme editor
Class Stuff
Camera Stuff
- Depth of field - From Tim Manwill back in 2008. This is a zip file that contains a blur texture (there is a readme in the file on how to install and how to use, plus screen shot examples). Basically what this does is allow you to create a brush and apply the texture. Then you can blur anything that is behind the texture. This gives you a way to fake depth of field blurring that is normal for shots. For example, when you have a closeup and you can see things going on in the background which you want to be blurry. Another trick to use is to create a cylinder and place the texture on the cylinder. Then put the people that you are shooting in the middle of the cylinder along with the camera. So, as you shoot and move the camera around in the environment, everything outside will be blurred.
-
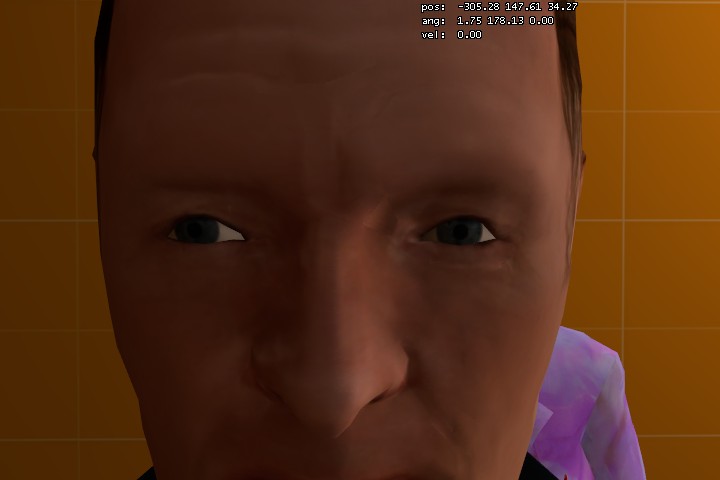
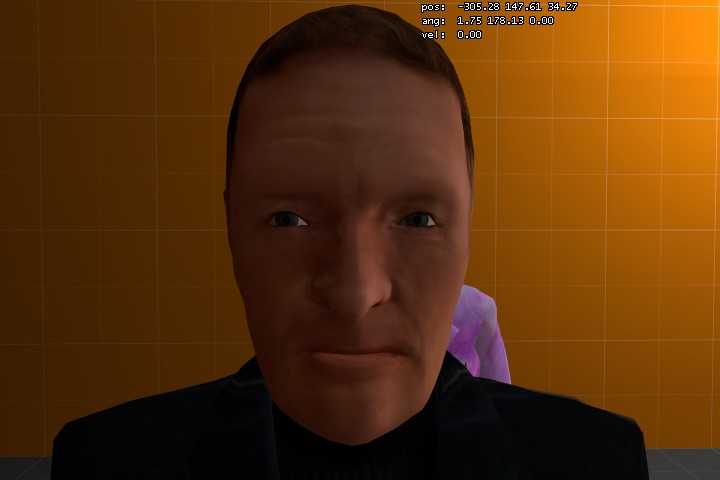
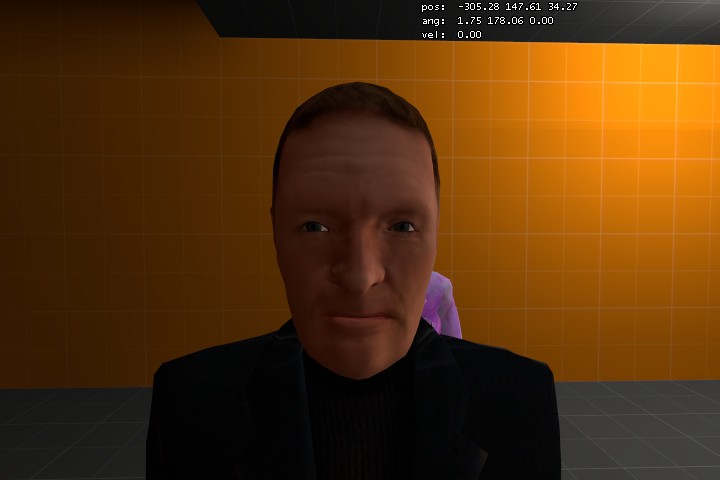
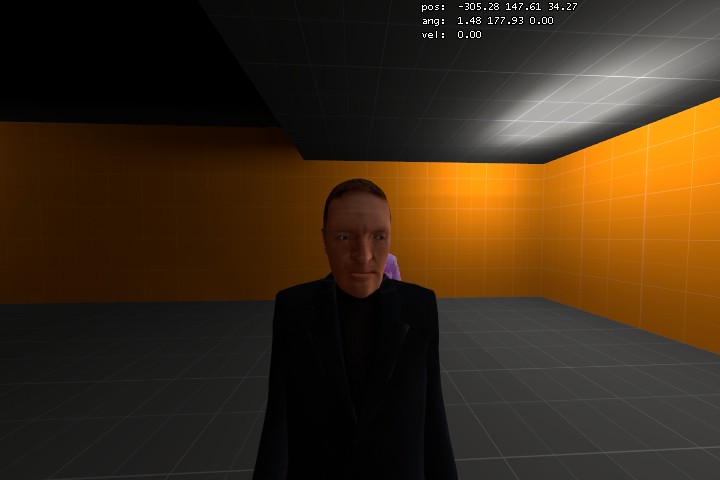
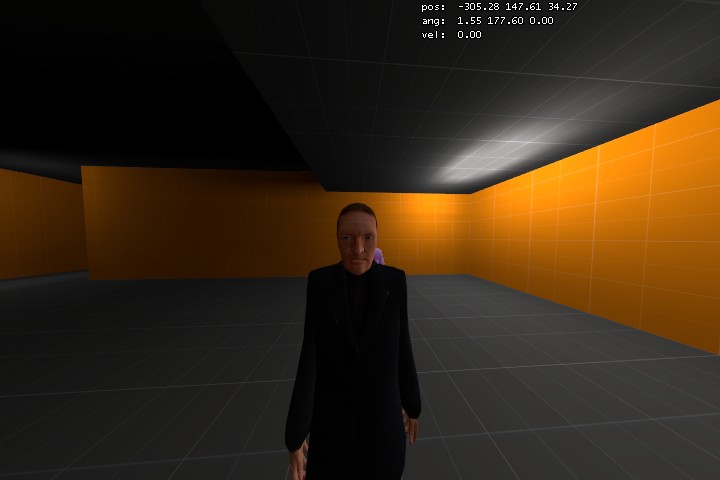
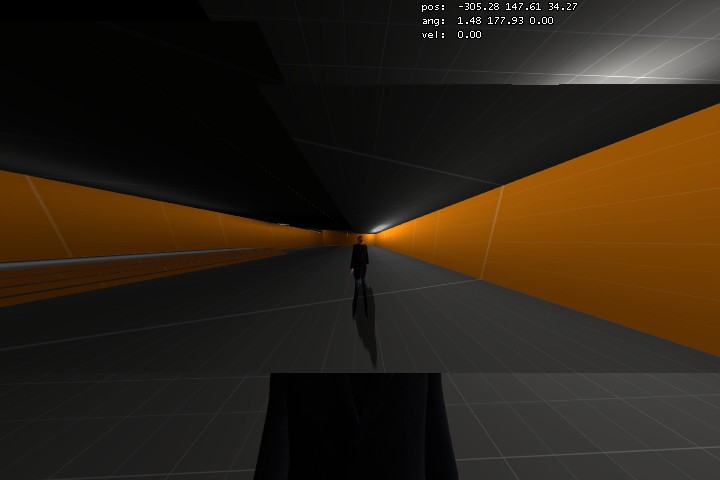
Extreme closeup - In HL2, you always see 75 degrees around you. This is ok for the game, but often you want something more like a real camera. So, you can tweak this value in the half-life console by using the fov command. fov sets the field of view. fov followed by some number will set the field of view to be much more restricted. This feels like a zoom as well. Also, you probably have noticed that when you get too close to a character, you end up clipping inside of them and see inside of their model. You can solve this by changing the fov. Just position the camera far enough away and then change the fov value. You can get an extreme closeup that is extremely close (down to even an eye if you want it). You will have to experiment with different fov values and also how far away you want to be when you do it. Here are some shots made with fov set to various values. The 75 value shows approximately where the camera is actually located.
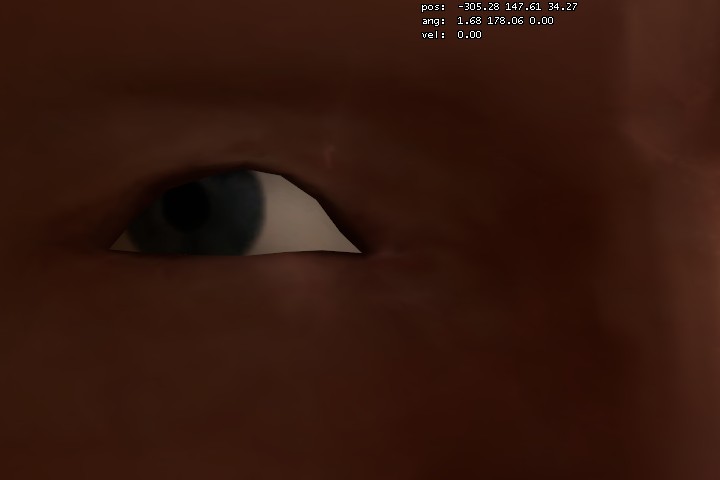 FOV 10
 FOV 30
 FOV 55
 FOV 75 (NORMAL)
 FOV 125
 FOV 145
 FOV 175 (LOTS OF DISTORTION)
- Affecting field of view dynamically - the env_zoom object allows you to dynamically change the fov while the game is playing. Just make an env_zoom and zoom and unzoom to make it change. You can set the length of time you want it to take to do the zoom (or set to 0 to make it happen instantly).
- Camera placement - one of the most challenging parts of making machinima is getting the exact right camera placement. Well, we have a technique that you can use that is described here.
Video
Hints from 2008 Students are here.